Just a quick one for today. Warwick Kinrade, Piers Brand and a couple of other contributors have produced the first Webzine for the Battlegroup game series, highlights include - A couple of small partisan based lists that prove that not all games have to be huge tank battles, expansions for Kursk in the form of T-70 Company and SU-85 and more, grab a free PDF copy from Iron Fist Publishing and enjoy.
Battlegroup Dispatches 1
That's all for now
Mike
1:72 WW2
An adventure into 20mm Wargaming.
Wednesday, 9 October 2013
Friday, 4 October 2013
Communist Communications
I'm back to painting again, it's been a while and with many things changing in my life I have not had much time for painting but I have just about completed a Radio Truck Diorama base.
A close up of the radio operators
A view of the radio team keeping track of troop movements
Mostly Britannia minis and truck body mounted on a Uni Model chassis, the chap by the map is an Elheim SS officer with a bit of re-modeling plus a Zvezda head
Next up is a Zvezda Medical Team as my Stretcher Party (who could do with a little more matte varnish)
5 more T-34/76 by PSC and Battlefield crew
And finally as a test the first of my SHQ Limber teams for my AT guns
Mike
Thursday, 1 August 2013
A long time away!
I've been away from blogging for a while, and unfortunately this is not a Wargames related post, I doubt anyone who follows or reads this Blog, or anyone who knows me in person for that matter
knows that I have been fighting against a mental illness for a long time (10 years).
Well to cut a long story short, as happens with a lot of people who get ill in there late teens - my Illness has started to fix itself, this I am assured happens to a lot of people in there late 20s to early 30s, raging hormones combined with the inability to deal fully with new complex emotions combined with being thrown in at the deep end of "Adult life" creates a bit of a gap in the cognitive process and parts of the brain start to miss fire.
But where my illness lay and where I have made the most progress in recovery is Social Anxiety, I didn't leave the house for months on end for well over 7 years, but suddenly this lifted and I have been ceasing the opportunity to start a new exercise plan and even going out to enjoy the odd beer, (a big step for me) so I had to make some cuts somewhere during this period of high activity and it was "Hobby Time" that went, the time became filled with long walks down the local canal and the beginnings of a weight lifting plan,
All good so far, I'm happy to report the loss of 16kg of weight and 8" of waistline, but no AFVs, Infantry or Aircraft built or painted for a while, .........A sacrifice I deem entirely worth it!
I'll be back with a proper update soon as a batch of Elhiem Russians is calling me and I want to test my Vallejo Coloured Airbrush Primers.
Until the next time
Happy Painting!
Thursday, 30 May 2013
Nail Varnish?!
I paint in clutter, bottles and tubes everywhere. I have always done this, but it is time for a change....
I had to organize my workspace, so I began looking into ways to store my bottles of Vallejo and found (after trawling the Internet and mastering Google-Fu) many ways people had used.
Then I saw it!
http://www.amazon.co.uk/gp/product/B00A78TXUI/ref=oh_details_o01_s00_i00?ie=UTF8&psc=1
PERFECT, So I bought two. They arrived this afternoon and I hastily built them, I found that if I got 2 slightly longer Bolts from my tool box I could join them together at the middle to make a long sturdy rack, and although the seller did not state the inner dimensions each said they held 60 bottles of nail varnish, that translates to 85 bottles of Vallejo each, I have 169 bottle at the moment so just enough (until I buy 2 more paints)
Here they are fully laden.
All in all a great purchase and a much tidier desk.
Happy Painting
Mike
I had to organize my workspace, so I began looking into ways to store my bottles of Vallejo and found (after trawling the Internet and mastering Google-Fu) many ways people had used.
- Test-tube racks (Too expensive)
- Wall mounted Spice racks (Too big a job)
- Custom Laser cut wood (also Too expensive)
Then I saw it!
http://www.amazon.co.uk/gp/product/B00A78TXUI/ref=oh_details_o01_s00_i00?ie=UTF8&psc=1
PERFECT, So I bought two. They arrived this afternoon and I hastily built them, I found that if I got 2 slightly longer Bolts from my tool box I could join them together at the middle to make a long sturdy rack, and although the seller did not state the inner dimensions each said they held 60 bottles of nail varnish, that translates to 85 bottles of Vallejo each, I have 169 bottle at the moment so just enough (until I buy 2 more paints)
Here they are fully laden.
All in all a great purchase and a much tidier desk.
Happy Painting
Mike
Wednesday, 29 May 2013
First Batch of Support Weapons.
I have got around to adding some much overdue Support Weapons to my Red Army Battlegroup for BGK, each infantry Platoon may take up to 4 Platoon Support Options, these range from Medics to Anti Tank guns with or without a Horse and Limber team. As I have an Infantry Company (3 Platoons) painted up I wanted to have a good varied amount of support, I began with the workhorse MMG of the Red Army - The Maxim, to make sure that I had enough I painted up three, 2 are from Elhiem (a mix and match of Matt's two sets) and the other is Zvezda with an additional crewman from Zvezda's PTRD team.
Close up rear view of each.
Next up are a couple of Mortars, A 5cm and an 82mm, The 5cm is a PSC Mortar with crew from the PSC Russian Zis2/3 with a Zvezda head swap plus an ordinary kneeling Sub Machine Gunner again from Elhiem,
The 82mm is Elhiem with some base debris from Skytrex.
A 45mmL46 was my next model of choice, It is Zvezda with an additional crewman from PSC with a Zvezda head swaps, a nice representation of the gun that can be built in firing or towed position, I will be adding a towed version with associated Horse drawn limber in the not too distant future.
Again from Zvezda is this little fellow, a 76.2mm infantry gun, and again it is a lovely little model that goes together with no fuss, I much prefer this version to the PSC one so I'll be picking up a few more soon. The additional crewman is from PSC with a Zvezda head swaps.
Finally from this painting batch is a Zis3 AT Gun, It is a Hybrid of a Unimodel and PSC Zis3 with PSC crew and Zvezda head swaps.
And just because I took the photo, Here is a group shot of the painting batch.
So that's it for the moment............. But "what's next?" I hear you cry.
I am currently adding loads of stowage to 5 PSC T34-76s and getting 6 more T70s ready so that will be coming soon to a blog near you,
Until then, Happy Painting!
Mike
Saturday, 25 May 2013
A Review of Instant Mold.
Today I present a review and tutorial on the product Instant
Moud, I bought this product Online from Firestorm Games in Cardiff (though they
seem to be out of stock at the moment)
So, What is it?
Instant Mold is re-usable putty with the texture of a Glue
Stick like you would use in a hot glue gun, It is sold under the non brand name of Oyumaru. It softens with very hot water to
the texture of blue tac (U.S. - fun tack), whilst warm you can press it over
details of miniatures or models or ANYTHING and it will take a negative print
from it, it then takes about a minuet to cool. When cool you can remove it from
the moulded object and fill the resulting negative with a putty of you’re
choice to create a copy, when the putty is cured you can remove the replica and
either cast another or drop the Instant Mold back into hot water and use it
again!
How much does it cost?
I picked mine up for about £10.00 for 6 strips, which are of
course re-usable.
How much detail is copied?
All of it, or at least 99%, it may take a few attempt to get
all of the air bubbled from the negative when placing in your putty
Can I fill a negative with resin?
No, most resins heat up as they cure so it would distort the
mould.
What are the moral implications of Stealing Detail?
Well, this is a biggie, IT IS WRONG, ILLEGAL AND IMMORAL TO
RIP OFF OTHER PEOPLES HARD WORK!
But there are a few reasons to give it a go. I have chosen the following
example to justify my use of the product.
Vinyl Tyres on plastic kits – We all know the horror of
track rot, I can’t help with this but I can offer a solution to vinyl tyres.
1 – Take a tyre and work out which way it will go on the
kit, you want the outside of the tyre UP so it will be pushed into the mould.
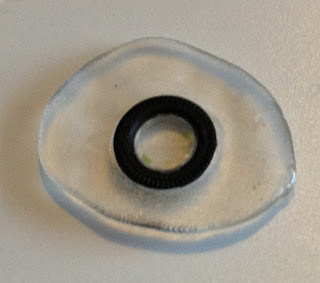
2 – Warm up the Instant Mold as per pack instructions and
push over the tyre making sure that it pushes tightly into the middle of the
Tyre
3 – Allow to cool for 1-2 minuets
4 – Remove the negative from the tyre and mix up your putty
of choice (I chose Green stuff)
5 – Fill the negative with your putty, use water to stop the
putty sticking to your fingers as putty will not stick to Instant Mold
6 – let your putty cure for 6 or so hours until set.
7 – Remove your cast from the mould and there you have it, A
tyre that will not rot over time
Bare in mind that this process has taken 6 hours and made 1
tyre, how many tyres are on a typical truck 6? 10? Or more so you may want to
make more than 1 negative mould to hasten the process
What else have I used it for?
I needed a load of crates for decorating AT and AA gun
bases, so I cast a load of the plastic boxes that come with PSC Zis2/3 AT guns
for this purpose, I do not see a problem with this so long as I do not plan so
sell the cast items or pass them off as my own work,
I have also added cloaks to Zvezda Russians by casting one
from an Elhiem Russian with PpsH. I created the mould in the usual way by
pushing it onto the cloak, but then I filled it with less putty than I needed
and pushed the Zvezda Russian into it while un-cured. I left it to cure fully
before removing the mold, I then had to add the front of the cloak using putty
and regular sculpting to hide the joins.
What do I think?
I do enjoy using this product and highly recommend it, when
I first used it I added new 3D shield designs to my WFB Dark Elves and I have
loved using Instant Mold for all sorts of things since.
There are more uses than I could possibly list here, have a
go but PLEASE…
DO NOT COPY
WHOLE AREAS!
DO NOT SELL CAST PIECES!
AND BE CAREFUL, THE OWNER OF THE ORIGINAL MAY HAVE EVERY
RIGHT TO ASK YOU TO STOP!
BUT MOST OF ALL……….HAPPY MODELING!
Mike
Wednesday, 22 May 2013
Infantry Company Finished (at last!)
Last Night I wrote how I had brought my first infantry company back from a mishap with Dip, so in this post I'll add the Photos of how they turned out.
Here is the full Company as per Battlegroup Kursk, All miniatures by Elhiem, CP, TQD and Zvezda or my own conversions based there upon.
The Company Command Squad
The First Platoon
Close ups
The Second Platoon
Close Ups
Third Platoon
Close Ups
And here are a few extra bits and pieces that I painted up at the same time.
Sniper, Spotter and Medic
Sapper Squad
And lastly a miscellaneous bunch that will be carried over to the next Company including a Anti-Tank rifle.
So that's it for now, on the painting table are the support options for this Company, Three Maxims, a 45mm Anti-Tank gun, a 76.2mm Infantry Gun and a 50mm Mortar plus additional loader teams and Horse drawn limbers for the guns.
Well that's it Until next time.
Happy Painting
Mike
Subscribe to:
Comments (Atom)


